Difference between revisions of "MyBrainshark"
From DurhamtechWiki
Jump to navigationJump to search| Line 38: | Line 38: | ||
# On the next screen, you’ll see your first PowerPoint slide on the left, a table of contents on the right, and below that, the Adobe Flash Player Settings box — in this box, click '''ALLOW'''. | # On the next screen, you’ll see your first PowerPoint slide on the left, a table of contents on the right, and below that, the Adobe Flash Player Settings box — in this box, click '''ALLOW'''. | ||
#* TIP: Your browser may (or may not) also prompt you to choose ALLOW again (message may appear at the top of the screen). | #* TIP: Your browser may (or may not) also prompt you to choose ALLOW again (message may appear at the top of the screen). | ||
| + | [[Image:Mybrainshark ALLOW flash.png|center]] | ||
# In the table of contents, the first slide is selected (has a black triangle beside it). To start recording audio for this slide, click the '''Record''' button, and begin speaking. If your slide has animations (such as bullets that appear when you click), you can click your mouse as you talk and they will appear. When finished, click '''STOP'''. Next you can… | # In the table of contents, the first slide is selected (has a black triangle beside it). To start recording audio for this slide, click the '''Record''' button, and begin speaking. If your slide has animations (such as bullets that appear when you click), you can click your mouse as you talk and they will appear. When finished, click '''STOP'''. Next you can… | ||
#* click '''Preview''' to hear your recording before saving it | #* click '''Preview''' to hear your recording before saving it | ||
Revision as of 15:23, 28 April 2014
Contents
- 1 What is myBrainshark?
- 2 How can I learn more and get started?
- 3 What do I need to use myBrainshark?
- 4 What will my students need to view my presentation?
- 5 How do I upload a PowerPoint and add audio?
- 6 How do I make my presentation active?
- 7 How do I put a link to my Brainshark presentation in Sakai?
- 8 Where can I find more info on how to use myBrainshark?
What is myBrainshark?
myBrainshark is a free online tool that lets you…
- upload PowerPoint presentations to the web
- add audio narrations to each slide (using a microphone or telephone)
- insert poll questions along the way for students to answer
- and much more!
With myBrainshark, it's easy to make changes later, if you need to add, delete or rearrange slides, or re-record audio for certain slides.
How can I learn more and get started?
View the myBrainshark Quick Tour Demo (4 min video)
What do I need to use myBrainshark?
To create a narrated presentation with myBrainshark, you'll need...
- a PowerPoint presentation that you’ve created (ending in ppt, pptx, or…)
- Adobe Flash player installed on your computer
- a microphone OR telephone for recording audio
- computer speakers or headset
Run this System Check to make sure your computer is ready to use myBrainshark.
What will my students need to view my presentation?
Your students will need...
- Adobe Flash player
- computer speakers or headset
How do I upload a PowerPoint and add audio?
- Go to http://www.brainshark.com/mybrainshark. Click Sign Up for Free and create an account.
- Once logged in, click Upload Content. On the next screen, click Upload a PowerPoint.
- Choose a PowerPoint file from your computer to upload. Wait while it is uploaded and converted.
- You can adjust the title or add a description, tags, etc if you want. Click Next when done.
- Follow the on-screen instructions to begin adding audio by microphone or by phone.
- If using a microphone, click on the microphone icon and move on to step 6.
- If using a phone, see this video for detailed instructions: Adding Audio with a Telephone
- After choosing “by microphone,” you’ll see a message letting you know that you will need to allow Adobe Flash to use your microphone. Click Continue.
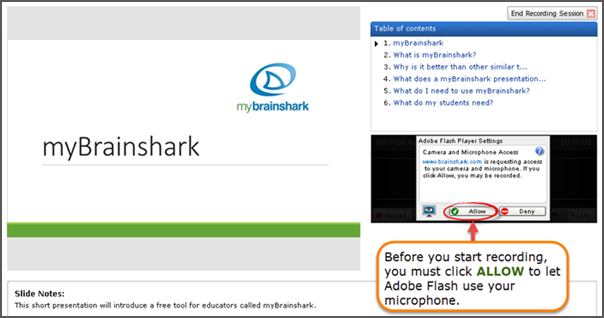
- On the next screen, you’ll see your first PowerPoint slide on the left, a table of contents on the right, and below that, the Adobe Flash Player Settings box — in this box, click ALLOW.
- TIP: Your browser may (or may not) also prompt you to choose ALLOW again (message may appear at the top of the screen).
- In the table of contents, the first slide is selected (has a black triangle beside it). To start recording audio for this slide, click the Record button, and begin speaking. If your slide has animations (such as bullets that appear when you click), you can click your mouse as you talk and they will appear. When finished, click STOP. Next you can…
- click Preview to hear your recording before saving it
- click Retry to record it again
- click Discard to delete it
- click Save to save it and move on!
- Repeat step 8 for each slide in your presentation. You can jump around by clicking a slide in the table of contents.
- When you finish recording audio for your slides — or when you’re ready to stop for a while — click End Recording Session in the upper right.
- You can now play your presentation, or choose an option on the right to edit it, add slides or questions, etc.
- When you are ready to share your presentation with students, you must choose the option to make it active.
How do I make my presentation active?
In order for others to see your presentation, you must make it active. To do this:
- Log in to myBrainshark.
- In the My Content area, click on one of your presentations.
- On the next screen, to the right of the presentation is box labeled “What Can I Do Now?” At the bottom of this box you’ll find a link to make your presentation active (or inactive).
How do I put a link to my Brainshark presentation in Sakai?
In Sakai, you can make a link to your Brainshark presentation. (At this time, you cannot embed the presentation in Sakai.)
Get the web address for the presentation
- Log in to myBrainshark.
- In the My Content area, click on one of your presentations.
- Below the presentation, click the option that says Embed/Link.
- The web address of your presentation is displayed. Highlight the full address and copy it.
Make a link in Sakai to your Brainshark presentation
In Sakai, you can put a link to your presentation in Resources, in Lessons, or almost anywhere else.
- In Resources
- In the Resources area of your course site, click Add to the right of any folder and choose Add Web Link.
- In the Web Address box, paste the web address you copied from Brainshark.
- In the Website Name box, type a name for the presentation that will appear to students.
- In Lessons
- On a Lessons page in Sakai, click Add Text.
- In the text editor box, type some text that you want students to click on to access the presentation, then use your mouse to highlight the specific text that you want to make into a link.
- In the text editor toolbar, click the Link icon (small globe with a link under it). In the URL box, paste the web address you copied from Brainshark. Click OK, then click Save.
Where can I find more info on how to use myBrainshark?
- Visit myBrainshark's Help & Training page
- Browse the list of Frequently Asked Questions
- Search the Knowledgebase

