Difference between revisions of "Sakai: Lessons"
| (One intermediate revision by the same user not shown) | |||
| Line 45: | Line 45: | ||
With the new Checklist feature, instructors can add a "to-do" list to any Lessons page, which helps students stay on track and allows instructors to view their progress. | With the new Checklist feature, instructors can add a "to-do" list to any Lessons page, which helps students stay on track and allows instructors to view their progress. | ||
| − | * [https://sakai.screenstepslive.com/s/sakai_help/m/101295/l/1340196-how-do-i-add-a-checklist-on-a-lessons-page How to | + | * [https://sakai.screenstepslive.com/s/sakai_help/m/101295/l/1340196-how-do-i-add-a-checklist-on-a-lessons-page How to add a checklist to a Lessons page] |
====Question==== | ====Question==== | ||
Latest revision as of 14:20, 28 September 2022
Contents
Lessons
Lessons is a flexible tool for adding content to your Sakai site.
- With the Lessons tool, you can share all kinds of content with students, including web links, documents, videos, and links to assignments, tests/quizzes, and forums.
- You can also create weekly subpages to organize your content, so students can find the week's materials and assignments all together in one place.
If you're teaching an online or hybrid course, it's important to use the Lessons tool to organize the content for each week of the course. (The Lessons tool can be useful for face-to-face courses as well.)
Getting Started
What content should you add to Lessons? how can you organize it?
- Based on information gathered from experienced instructors, here's a template you can use to organize your content for your lessons:
Basics
- Sakai 21 User Guide: Lessons
- Reviewing the Basics of Sakai's Lessons Tool (video)
Intermediate
- How to Build a Well-Designed Subpage: Video | Handout
- Creating Tool Links in Sakai Lessons: Video | Handout
- Adding instructional content to Lessons subpages:
- Organizing Your Lessons Subpages and Course Menu: Video | Handout
- How to enable Lessons subpage navigation in the Tool Menu
- Setting up conditional release using required items and pre-requisites (UNC)
Best Practices for Using Sakai's Lessons and Course Design
Working with Sections and Columns
- How do I create multiple sections on a Lessons page?
- How do I create two columns on a Lessons page?
- How do I merge columns and sections to one block?
- How do I create a collapsible section?
- How do I change the background color of a section
Interactive Features in Lessons
Checklist
With the new Checklist feature, instructors can add a "to-do" list to any Lessons page, which helps students stay on track and allows instructors to view their progress.
Question
Instructors can add a Multiple Choice or Short Answer question directly to a Lessons Page. The questions can be graded (correct answer specified) or used for polling (no correct answer specified).
Comments
Instructors can allow students to add comments to a Lessons page. The comments can be graded.
Interactive Video
Interactive Video is an external tool available within Lessons. With this tool, instructors can add questions to Warpwire or YouTube videos for students to answer as they watch.
Student Content (aka Student Pages)
The Student Content feature in Lessons is great for student projects.
- If you enable this feature, students (or groups) will be able to create their own pages in Lessons, containing text, web links, pictures, videos, and links to documents.
- Follow these steps to add the Student Content feature to your Lessons area: Instructors: How to allow students to add content to Lessons
- After adding the feature, share these instructions with your students: Students: Step-by-step instructions on how to add content to student pages.
- Here's some of the capabilities of Student Pages:
- Comments can be added to each student page
- You can grade student pages and/or comments
- Peer review and group rubrics are available; but you must inform students of peer review deadlines
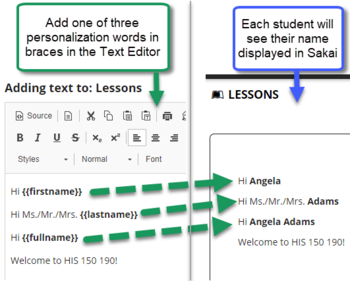
Personalize Text to Display a Student's Name
In the Sakai Text Editor you can add a name token to display the name of the student viewing the page. Three options are available:

Important note: Make sure to type double sets of braces (not parens or brackets) around the name token. The image below demonstrates how each name tolken appears to the student.
