Project Sites for Advisors
Contents
- 1 About project sites for advisors
- 2 How do I access my advising project site?
- 3 What can I do with the site?
- 4 How are advisees added to my site?
- 5 How can I see a list of my advisees in the project site?
- 6 How do I make my advising project site visible to advisees?
- 7 How do students access the site?
About project sites for advisors
Each academic advisor has a project site on Sakai that can be used to share information and communicate with advisees.
- Project sites in Sakai look and act much like course sites, so if you already use Sakai for teaching, you'll be familiar with using your project site.
- If you haven't used Sakai as an instructor, you should register for and complete the Intro to Sakai online workshop to learn the basics before using your project site for advising.
How do I access my advising project site?
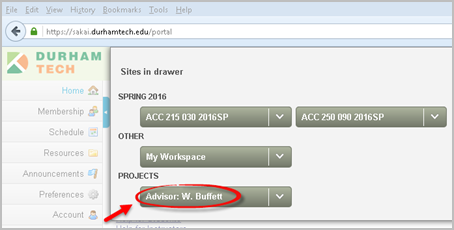
- Log in to Sakai, and click More Sites along the top.
- Within the window that lists your sites, scroll all the way to the bottom. You’ll see your advising site at the bottom, with your name on it, under the Projects category.
- (Or, instead of clicking More Sites, you can click Membership on the menu on the left, and look for your advising site in the list.)
What can I do with the site?
Project sites in Sakai work almost exactly like course sites. As an advisor, you have the maintain role in your advising site, which is just like the instructor role in a course site. With this role you can add tools and content, publish the site, email site participants, etc. Tools that may be useful for advising include...
- Email – send emails to all or selected advisees
- Resources – provide documents advisees need
- Lessons – post info and/or helpful links
- Sign-up – allow students to select an appointment time from a range of dates/times
- Meetings – have a "live" online meeting with a student
How are advisees added to my site?
Each day an automated process adds any new advisees that have been assigned to you (and inactivates any that were unassigned).
NOTE: The Advising office in Student Services handles assigning advisees (and unassigning them) to advisors in Colleague. Changes they make in Colleague to your advisee list will be reflected in your project site on Sakai the next day.
Your assigned advisees are "enrolled" in your advising project site with the access role, which is similar to the student role in course sites.
How can I see a list of my advisees in the project site?
In your project site, on the course menu, click Site Info. A list of your assigned advisees will display on the lower part of the screen.
NOTE:
- DO NOT change the role of any advisee. All advisees should have the access role. Only the advisor should have the maintain role.
- If you remove (or inactivate) any advisees in this list, they will be added back (or made active again) the following day. The advisee list in Sakai is refreshed each day based on the official list of advisees in Colleague.
- If for some reason you need to give additional students access to your advising project site, you can do that. In Site Info, just click Add Participants at the top, enter the student's ConnectMail address in the box, and click Continue. For role, be sure to choose ACCESS and click Continue. Click Continue again, then click Finish.
How do I make my advising project site visible to advisees?
As with course sites, you have to "publish" your advising site before students will be able to see it.
To publish a site, click the Publish Now button in the upper left area of the site (just under the Durham Tech logo).
If for some reason you need to "unpublish" the site again, go to Site Info > Manage Access, select "Leave as Draft" and click UPDATE.
How do students access the site?
The same way you do: Log in to Sakai, click More Sites, scroll to the bottom, and look under the Projects category. (Or click Membership instead of More Sites)
