Sakai 19 Known Issues
Known Issues/Solutions
Lessons: Some column breaks don't display correctly to students
- Issue: The column break feature in Lessons lets you display two "boxes" of information side-by-side on a page or subpage. This does not work properly when both of these conditions are true:
- (1) the column break is on a subpage, and
- (2) the column break is at the top of the page (i.e it is the first content on the page).
- When the above conditions are true, the columns will display correctly (side-by-side) to the instructor, but when viewed as a student, the right-side column box displays underneath the first box.
- Solution: Avoid using columns as the first item on a subpage. As a work-around, you can put something on the subpage (such as some text), then add the columns below it. Try "view as student" to make sure it displays the way you want it to.
Site Info-Import issues with Text Editor created audio files
- Issue: After Importing a course with audio files created using the Text Editor's "Record Audio Clip" tool; audio files won't play for students (but will play for instructors).
- For example, in Lessons, if an instructor used the Text Editor-Record Audio Clip tool to create an audio file, both instructors and students can play the audio file.
- BUT after using Site Info-Import from Site in a new course site, in Lessons, the students won't be able to play the audio files in the new course site.
- To see the issue: Create audio files in Lessons or other Sakai tools using the Text Editor-Record Audio Clip tool. Use Site Info-Import from Site in a new course site. Copy Lessons or appropriate Sakai tools containing audio files, and other Sakai tools as needed. Instructors can play the audio files in Lessons and in other tools in the new course site, but students in the course can not. Instructors can download the audio files, but can only upload to Resources, small audio files (<25MB), to their new course site.
- Solution: Please contact sakaihelp@durhamtech.edu.
- We'll download the audio files, convert them to a smaller size (file type MP3) using Audacity, and will upload your optimized audio files to your new course site's Resources area.
- You can then link to the audio files located in Resources.
- The audio files can be imported with your Resources files in future; both instructors and students will be able to see the audio player and play the audio files in new courses.
- To Avoid Future Issues: Create audio recordings using Vocaroo or another tool, such as Audacity.
- In the Sakai Text Editor, click on the Source button. Paste the embed code provided by Vocaroo. Save the changes.
- Note: Vocaroo does not keep recordings forever. After creating a recording in Vocaroo, below the link/embed code, it states "Download as"; click on the MP3 link, to download the MP3 audio file on your computer.
- Upload this file into your course's Resources area, with an easily identifiable name, as a backup to use in the future. If needed: Here's a refresher on how to upload a file to Resources
- If the file is too large to upload to Resources, make sure the file is in a location you can easily find on your computer in the future.
- Accessibility Recommendation:
- Please upload a text transcript to accompany your audio clips. It may be helpful to type a script before you record. This can be a useful strategy to help your audio clip remain focused, and the script can be uploaded to Sakai to serve as the audio clip’s transcript. Not sure how to create a text transcript file? See How to create a text file using Windows Notepad If needed: Here's a refresher on how to upload a file to Resources
Sakai documentation: SAK-33674
HTML notice
- Issue: A few instructors have reported a notice in a yellow box (as shown below) popping up in their sites. The notice may appear on the course home page, or after copying/pasting content into a text editor box somewhere in Sakai.
- Solution: The notice indicates that content that you've entered into Sakai (most likely, content that you copied from somewhere else and pasted in) contains some behind-the-scenes code that is problematic. In some situations, the boxes appear once and then go away forever, and all is fine. However, in some cases, they may pop up every time you visit the page. In the latter case, please contact sakaihelp@durhamtech.edu and let us know which site and where in the site the notices are appearing, and we should be able to clean things up for you.

Tips
Clear web browser cache
When using dynamic web sites like Sakai, web browsers might show you an outdated version of a page (what is called a "cached" version of the page). By default, browsers keep previous versions of a page to improve response time. But this behavior might prevent you from displaying the latest information.
- Here are the instructions for clearing your web browser cache for Firefox, Chrome or Internet Explorer
Lessons: Displays "Download file" when linking to a document
In Lessons, after adding a link to a document (such as a Word, PowerPoint or text file), a "download file" link and "message" appear, as shown below:

Why is this happening? If you click Add Content or on a "plus" sign (+), then click on:
- Add Content Links, a link will be created to your document or presentation, as desired.
- But if you click on Embed content on page, you are trying to display or show your document, like you would a video or image. Microsoft Word and PowerPoint files can't be displayed in a web browser; therefore, a download file link and "instructions" are provided.
What are the steps to add a link to a document? Watch this one minute video and/or do the following:
- In Lessons, at the top, click on Add Content or click on a "plus" sign (+) to the right or below your content
- Click on Add Content Links NOT Embed content on page
- Click on the Choose or Browse button to select a document or click on "Or select existing files from Resources"
- After selecting your file, either click Save or Continue, then Save. Your link to your document will now display correctly.
Turnitin
- In the prior version of Sakai, Turnitin would check only one attachment per student per assignment. Therefore, instructors were advised to choose "Single file upload" when setting up Turnitin-enabled Assignments, to prevent a student from uploading more than one document. If desired, you can now allow students to submit multiple attachments on a single assignment, and all attachments will be checked by Turnitin.
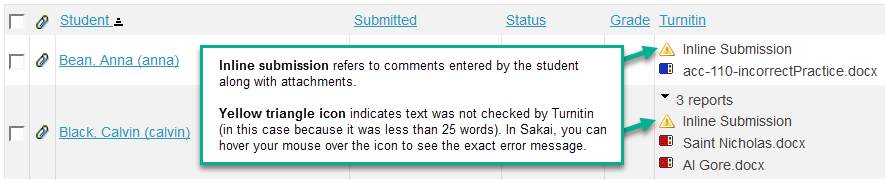
- On the Assignment grading screen in Sakai, instructors will see a Turnitin column which presents information a bit differently than in the prior version. Each document submitted will show an icon. Point to the icon to see additional information.
- For example, a yellow triangle icon
 can mean a couple of different things:
- the attachment has been submitted and is pending review (wait 15-30 minutes for results to be returned) OR
- an error occurred and Turnitin could not process the document (contact sakaihelp@durhamtech.edu for assistance).
- For example, a yellow triangle icon
- When setting up a Turnitin-enabled Assignment, if you choose an option (e.g. "Inline and Attachments") that allows students to enter comments along with their attachment(s), those comments will be checked by Turnitin -- but only if the comment text exceeds 20 words. (This is a general rule for Turnitin: any documents or text containing fewer than 20 words are not checked, and will return an "error" stating that the content could not be processed. This error is represented by a yellow triangle.)

New Gradebook
- Instructors can choose to use the old Gradebook (now called "Gradebook Classic") or the new, redesigned one (called simply "Gradebook"). Learn more about the two gradebooks in Sakai 11
- The new Gradebook requires horizontal scrolling to see all items. Inconveniently, the horizontal scrollbar is at the bottom, which means you have to scroll all the way down before you can scroll left to right! An easier method may be to use the right and left arrow keys on your keyboard to navigate around in the new Gradebook.
Favorite, Hide and Organize Course Sites and Categories
- You can now "favorite" sites that you want to display at the top of your Sakai page. View this short video or follow the instructions below:
- In Sakai in the upper right corner, click on Sites, then click on the "gray" star to the left of a site you want displayed at the top of your Sakai page; the star will display "yellow"
- After you click on the "X" in the upper right corner of the Sites drop-down box, in the top middle of your page, you can click on a link to "reload" your page, to see your favorites listed across the top of your page
- Also, in Sites, at the top right of your Sakai page, you can also "un-favorite" sites, by clicking on the yellow star to the left of the course site(s)
- Previously you could hide sites from your "Sites" area that you no longer wanted to see. You still can, but there's more!
- Now you can also hide categories of course sites (such as 2018FA or 2018CE3):
- In Sakai at the top left, click on the Home button:
- On the menu on the left, click on Preferences
- Click on the Sites tab. Click in the checkbox beside a category and/or sites
- At the bottom, click Update Preferences.
- In Sakai at the top left, click on the Home button:
- Now you can also hide categories of course sites (such as 2018FA or 2018CE3):
Resolved Issues
Lessons: Student Content/Pages, Comments, Question: Can Not Enter Zero Grade for Students without Submissions
- This issue has been resolved:
- Issue: In Lessons, after you added Student Content, if you chose to make it a graded assignment, there wasn't a way to enter a zero grade for students who did not submit the assignment. The same issue existed for graded Comments and graded Questions.
- Solution: Student Pages The Sakai Community fixed these issues. As soon as you make your Student Content a graded assignment, you'll see in the Student Pages area two new features: 1) "Missing Pages", a list of student's who haven't submitted their student page 2) A button titled: "Set grades to zero for students without submissions".
- Solution: Comments/Add Question In Lessons, after clicking on the grading icon (next to the Edit item icon); at the bottom of the grading pane, a new link has been added "Set grades to zero for students without submissions".
- Previous Solution: Instructors had to create a separate Gradebook column to record student grades for student pages and for comments and questions, so they could assign zeroes to students who did not submit the assignment, comments and/or question answer.
Assignments: Peer Reviewer Receives an Error When Attaching File
- This issue has been resolved:
- Issue: When a student completing a peer review clicked Reviewer Attachment to attach a file, he received an error.
- Solution: Students completing a peer review can click "Reviewer Attachment" and attach a file, with no errors. Attachments and/or text can now be submitted.
- Previous Solution: Students can still copy and paste content into the Reviewer Comments area, the "Peer Reviewer text box"; the Peer Review text can then be submitted.
Buttons fail to function
- This issue has been resolved: Some instructors reported instances of buttons not working in Sakai 11. For example, when adding or editing an Assignment, you click the "Post" or "Save" button and nothing happens. Or after editing home page content, you click "Continue" and nothing happens.
- Prior Solution: Clearing the cache resolves this issue. For a full clear of the cache, follow these steps:
- Log out of Sakai
- Clear your browser's cache - see instructions for clearing the cache in most any browser.
- Note: Be sure to clear everything, including cache, cookies, history, etc.
- Close out of the browser completely
- Re-open the browser, log in again, and things should work correctly.
Note: This should solve the problem so that it does not recur. However, if you use another browser or computer, you may have to clear the cache there as well. If the problem occurs more than a few times on the same computer or browser, please contact sakaihelp@durhamtech.edu.