Difference between revisions of "Meetings: Using the Whiteboard"
From DurhamtechWiki
Jump to navigationJump to search| (25 intermediate revisions by the same user not shown) | |||
| Line 1: | Line 1: | ||
====Whiteboard Features==== | ====Whiteboard Features==== | ||
| − | |||
| − | |||
| − | + | The Presenter can use a Whiteboard in Meetings (and students, if allowed). <br> | |
| + | On the Whiteboard tool bar, at top, select a tool to click on and draw with, such as: | ||
| + | * First tool: Select a T (text), a line, shapes (circle, triangle, rectangle), and a pencil (freehand drawing) | ||
| + | * Second tool: For shapes, you can pick a thickness; for text, choose a font size | ||
| + | * Third tool: Click on the color box to pick a drawing color | ||
| + | * Fourth tool: Click on the backward arrow to undo your last action | ||
| + | * Fifth tool: Click on the trashcan to clear the whiteboard | ||
| + | * Last tool: The Moderator/Presenter can click on the bottom whiteboard icon, "Multi-User Whiteboard" icon, to allow ALL participants to draw on the whiteboard. | ||
| + | ** You can draw on the default presentation page, an uploaded document, or you can upload a blank document. | ||
| + | ** To draw perfect shapes (rectangle, circle, triangle), click and hold the Ctrl or Shift key on your keyboard, then click and draw your shape. | ||
| − | + | [[Image:Bbb-whiteboard-screen.jpg|border|Alt=Whiteboard with the word "Pencil" written on it, plus a drawn square, circle, triangle, underline, and typed text, all added with whiteboard icons ]] | |
| − | |||
| − | |||
| − | |||
| − | |||
| − | |||
| − | |||
| − | + | =====I need a blank page to draw on!===== | |
| + | * The default presentation contains blank slides: | ||
| + | ** At the bottom middle of the presentation area, click on the next arrow, to get to a blank slide to use with the Whiteboard. | ||
| + | ** The default presentation (default.pdf) contains five or more blank slides. | ||
| + | * If you need to get back to the default slides: | ||
| + | ** In the lower-left corner below the Presentation, click on the Actions button (a plus sign), click on "Upload a Presentation", then to the right of default.pdf, click on the circle button, then the Upload button to display the default.pdf again, with its blank pages | ||
| − | + | [[Image:Bbb-presentation-icons.jpg|border|Alt=Upload Presentation button (plus icon), above it, a previous slide (left arrow), Slide 2, and Next slide (right arrow)]] | |
| − | |||
| − | |||
Latest revision as of 15:47, 27 August 2020
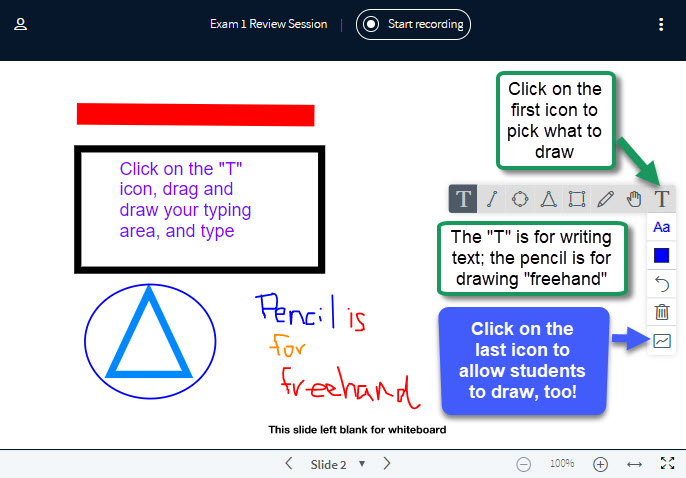
Whiteboard Features
The Presenter can use a Whiteboard in Meetings (and students, if allowed).
On the Whiteboard tool bar, at top, select a tool to click on and draw with, such as:
- First tool: Select a T (text), a line, shapes (circle, triangle, rectangle), and a pencil (freehand drawing)
- Second tool: For shapes, you can pick a thickness; for text, choose a font size
- Third tool: Click on the color box to pick a drawing color
- Fourth tool: Click on the backward arrow to undo your last action
- Fifth tool: Click on the trashcan to clear the whiteboard
- Last tool: The Moderator/Presenter can click on the bottom whiteboard icon, "Multi-User Whiteboard" icon, to allow ALL participants to draw on the whiteboard.
- You can draw on the default presentation page, an uploaded document, or you can upload a blank document.
- To draw perfect shapes (rectangle, circle, triangle), click and hold the Ctrl or Shift key on your keyboard, then click and draw your shape.
I need a blank page to draw on!
- The default presentation contains blank slides:
- At the bottom middle of the presentation area, click on the next arrow, to get to a blank slide to use with the Whiteboard.
- The default presentation (default.pdf) contains five or more blank slides.
- If you need to get back to the default slides:
- In the lower-left corner below the Presentation, click on the Actions button (a plus sign), click on "Upload a Presentation", then to the right of default.pdf, click on the circle button, then the Upload button to display the default.pdf again, with its blank pages
