Difference between revisions of "Meetings: User Area"
From DurhamtechWiki
Jump to navigationJump to search| Line 7: | Line 7: | ||
====Users Area Settings==== | ====Users Area Settings==== | ||
| − | * '''In the | + | * '''In the upper right corner of the Users area,'''instructors can click on the Settings icon (it looks like a wheel): |
| − | |||
* In Settings, the presenter can Mute all users, but it is preferable to '''Mute all users except the Presenter!''' | * In Settings, the presenter can Mute all users, but it is preferable to '''Mute all users except the Presenter!''' | ||
| − | ** Presenters can Lock Viewers from using different devices (microphone | + | ** Presenters can Lock Viewers from using different devices (webcam or microphone), stop users from viewing other participants webcams, Private Chat, Public Chat and Shared notes. |
| + | * Students can click on their name in the Users area, click on Set status and select an emoticon, such as Raise (hand), Confused, Sad, Happy, Applaud. | ||
| + | ** At any time, the presenter can click on the Settings icon to clear the status icons that participants have chosen. | ||
*** '''Note:''' Don't lock viewers from using the Public Chat if they don't have a microphone, they won't be able to communicate with you! | *** '''Note:''' Don't lock viewers from using the Public Chat if they don't have a microphone, they won't be able to communicate with you! | ||
** Also, in the Settings area, presenters can click on Breakout Rooms to divide students into groups, for a time limit. | ** Also, in the Settings area, presenters can click on Breakout Rooms to divide students into groups, for a time limit. | ||
[[Image:UserSettings.jpg|border|Alt=At bottom of User area, wheel is highlighted, and all Settings are displayed]] | [[Image:UserSettings.jpg|border|Alt=At bottom of User area, wheel is highlighted, and all Settings are displayed]] | ||
Revision as of 17:51, 10 June 2019
Users Area
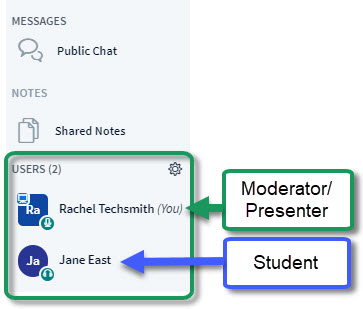
The Users Area, in the upper left corner of your Meetings session, has been updated and simplified.
- Whenever a student enters the Meeting, a round icon will appear to the left of their name.
- Usually beside the presenter, a square icon will display to the left of their name, as shown in the image below.
Users Area Settings
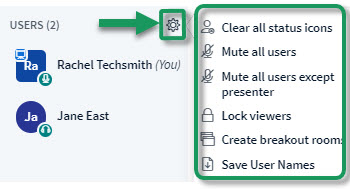
- In the upper right corner of the Users area,instructors can click on the Settings icon (it looks like a wheel):
- In Settings, the presenter can Mute all users, but it is preferable to Mute all users except the Presenter!
- Presenters can Lock Viewers from using different devices (webcam or microphone), stop users from viewing other participants webcams, Private Chat, Public Chat and Shared notes.
- Students can click on their name in the Users area, click on Set status and select an emoticon, such as Raise (hand), Confused, Sad, Happy, Applaud.
- At any time, the presenter can click on the Settings icon to clear the status icons that participants have chosen.
- Note: Don't lock viewers from using the Public Chat if they don't have a microphone, they won't be able to communicate with you!
- Also, in the Settings area, presenters can click on Breakout Rooms to divide students into groups, for a time limit.
- At any time, the presenter can click on the Settings icon to clear the status icons that participants have chosen.

