Difference between revisions of "How do I upload a document to display to my students?"
From DurhamtechWiki
Jump to navigationJump to search| (38 intermediate revisions by the same user not shown) | |||
| Line 1: | Line 1: | ||
| − | In the '''Presentation''' area (in the middle of the Meeting), in the lower left corner, click on the ''icon | + | ====During a Meeting: Upload a Document to Display in Meetings==== |
| + | In the '''Presentation''' area (in the middle of the Meeting), in the lower left corner, presenters can click on the ''"plus icon", then click on '''Upload a presentation'''. | ||
| − | [[Image:Bbb-uploadpresentation.jpg]] | + | [[Image:Bbb-uploadpresentation.jpg|border|Alt=Lower left corner of the Presentation area, there is an icon with a plus sign on it, plus microphone, phone, webcam, and screen sharing icons]] |
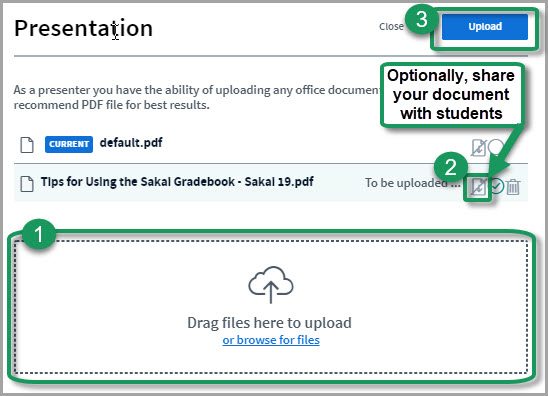
| − | Now in the | + | Now in the Presentation dialog box: |
| − | + | # Drag your file or click in the dotted box; if needed, find your document, select your document and save it. | |
| − | + | # If you'd like to share your document with your students, across from your document title, click on the crossed out download arrow. | |
| − | + | # Now that you've selected a document, click on the '''Upload''' button (you'll see a Progress status displayed until your document is uploaded successfully). | |
| − | + | Your document will display. Remember, save your files as pdf's for the best (and fastest) results. | |
| − | |||
| − | [[Image:Bbb-SelectFile.jpg | + | [[Image:Bbb-SelectFile.jpg|border|Alt=At the bottom of the Presentation dialog box, the dotted file upload box is circled. Above it, across from a file name, an arrow points to the "Enable download of presentation" button. At top right, the Upload button is circled]] |
| − | |||
| − | |||
| − | |||
| − | |||
| − | |||
| − | |||
| − | |||
| − | |||
| − | |||
| − | |||
| − | |||
| − | |||
| − | |||
| − | |||
| − | |||
| + | =====Presentation FAQ's===== | ||
* Is there a page limit for uploaded files? '''100 pages.''' | * Is there a page limit for uploaded files? '''100 pages.''' | ||
Latest revision as of 11:45, 13 March 2020
During a Meeting: Upload a Document to Display in Meetings
In the Presentation area (in the middle of the Meeting), in the lower left corner, presenters can click on the "plus icon", then click on Upload a presentation.
Now in the Presentation dialog box:
- Drag your file or click in the dotted box; if needed, find your document, select your document and save it.
- If you'd like to share your document with your students, across from your document title, click on the crossed out download arrow.
- Now that you've selected a document, click on the Upload button (you'll see a Progress status displayed until your document is uploaded successfully).
Your document will display. Remember, save your files as pdf's for the best (and fastest) results.
Presentation FAQ's
- Is there a page limit for uploaded files? 100 pages.

