Difference between revisions of "Meetings: Add and Create a Meetings Session"
From DurhamtechWiki
Jump to navigationJump to search| Line 50: | Line 50: | ||
<li style="padding-bottom: 3px">[[Media:Instructions_for_Creating_a_One-on-One_Meetings_Session.pdf | Private Meeting or One-on-one Meeting with a Student (PDF)]]</li> | <li style="padding-bottom: 3px">[[Media:Instructions_for_Creating_a_One-on-One_Meetings_Session.pdf | Private Meeting or One-on-one Meeting with a Student (PDF)]]</li> | ||
<li style="padding-bottom: 3px">[[Media:Instructions_for_Creating_Student_Group_Meetings-V1.pdf | Student Group Meetings (PDF)]]</li> | <li style="padding-bottom: 3px">[[Media:Instructions_for_Creating_Student_Group_Meetings-V1.pdf | Student Group Meetings (PDF)]]</li> | ||
| − | <li style="padding-bottom: 3px">Virtual Office Hours </li> | + | <li style="padding-bottom: 3px">[[Media: | Virtual Office Hours (PDF)]]</li> |
</ul> | </ul> | ||
</big> | </big> | ||
| + | Instructions_for_Creating_Virtual_Office_hours_5-19-21.pdf | ||
==Learn More== | ==Learn More== | ||
<p>[[File:Icon-Home.png|40px]] <big> Take me back to the [[Sakai: Meetings|Meetings Home page]].</big></p> | <p>[[File:Icon-Home.png|40px]] <big> Take me back to the [[Sakai: Meetings|Meetings Home page]].</big></p> | ||
Revision as of 08:09, 19 May 2021
Contents
Add and Create a Meetings Session
Before creating your first Meeting session, you must add the Meetings tool to your Sakai site.
Next, based on the type of Meeting you need to create, follow the step-by-step instructions provided below.

Add the Meetings tool
- Open a course site on Sakai. From the course menu, click Site Info.
- Click the Manage Tools tab, and then scroll down and place a check next to Meetings.
- Scroll to the bottom and click Continue, then click Finish. Meetings now appears on your course menu
Create a Meeting for an instructor and students
- From the course menu, click Meetings.
- Click Create Meeting.
- If displayed: Please disregard a warning box that states “(x) Some users are not allowed to participate in meetings. Please revise tool permissions”.
- It refers to inactive students in your course site (that you can’t see).
- Type a title for the meeting (required). Your students will see the title in the list of meetings.
- Leave the default setting for each of the remaining options.
- Click the Save button to create your meeting.
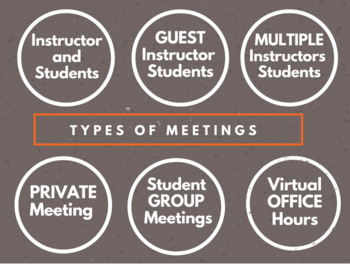
Step-by-Step Instructions for Creating Different Types of Meetings
- Meeting for an instructor and students (See instructions above)
- Meeting for Guest, Instructor, and students
- Instructions for Adding an Employee (Guest) to a Meeting (PDF)
- If a guest is not a Durham Tech employee you can invite the guest to your ACTIVE Meeting session:
- Meeting for Two or More Instructors and Students (PDF)
- Private Meeting or One-on-one Meeting with a Student (PDF)
- Student Group Meetings (PDF)
- [[Media: | Virtual Office Hours (PDF)]]
Instructions_for_Creating_Virtual_Office_hours_5-19-21.pdf
Learn More
![]() Take me back to the Meetings Home page.
Take me back to the Meetings Home page.