Difference between revisions of "Meetings: User Area"
From DurhamtechWiki
Jump to navigationJump to search| Line 3: | Line 3: | ||
'''The Users Area, in the upper left corner of your Meetings session, has been updated and simplified.''' | '''The Users Area, in the upper left corner of your Meetings session, has been updated and simplified.''' | ||
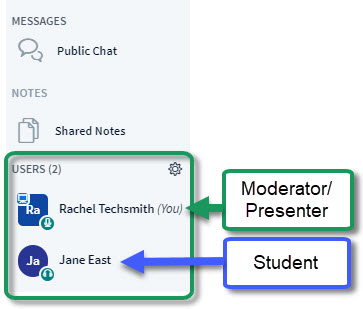
* Whenever a student enters the Meeting, a round icon will appear to the left of their name, which contains either a microphone or headset icon, depending on how the student connected to the session. | * Whenever a student enters the Meeting, a round icon will appear to the left of their name, which contains either a microphone or headset icon, depending on how the student connected to the session. | ||
| − | * Beside the moderator's name, a square icon will display, usually with a microphone icon as well. | + | * Beside the moderator's name, a square icon will display, usually with a microphone icon as well, as shown below. |
** At any time, moderators (usually the instructor), can click on a user's name, and promote users to be presenters or demote them. | ** At any time, moderators (usually the instructor), can click on a user's name, and promote users to be presenters or demote them. | ||
** Both moderators and presenters can display materials in the presentation area, unlike viewers/students. | ** Both moderators and presenters can display materials in the presentation area, unlike viewers/students. | ||
Revision as of 13:35, 27 June 2019
Users Area
The Users Area, in the upper left corner of your Meetings session, has been updated and simplified.
- Whenever a student enters the Meeting, a round icon will appear to the left of their name, which contains either a microphone or headset icon, depending on how the student connected to the session.
- Beside the moderator's name, a square icon will display, usually with a microphone icon as well, as shown below.
- At any time, moderators (usually the instructor), can click on a user's name, and promote users to be presenters or demote them.
- Both moderators and presenters can display materials in the presentation area, unlike viewers/students.
Users Area Settings
- Students can click on their name in the Users area, click on Set status and select an emoticon, such as Raise (hand), Confused, Sad, Happy, Applaud.
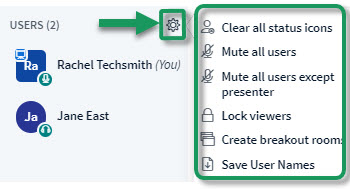
- At any time, the moderator can click on the Manage Users icon (wheel), which allows the moderator to:
- Clear the status icons that participants have chosen
- Mute all users (including yourself), so it is preferable to select Mute all users except the Presenter!
- Lock Viewers from using different devices (webcam or microphone), stop users from viewing other participants webcams, and can lock Private Chat, Public Chat and Shared notes.
- Note: Don't lock viewers from using the Public Chat. If they don't have a microphone, they won't be able to communicate with you!
- Create breakout rooms to divide students into groups, for a specific amount of time.
- Select Save User Names to download a text file that contains a list of users who joined the meeting.

